
Features
- 16 (non-velocity sensitive) buttons for sending midi messages
- Preset midi banks that can be re-mapped
- Note: these mappings are per session. They will not be saved when the device powers off.
- Velocity control
- Repeat mode with optional note lock
- With free or BPM sync (ROUGH bpm sync, I should say)
Hardware / Tools
- (Tools) - Soldering Iron, Solder, M3 Allen Wrench, 3D Printer.
- 1 3D Printed case (models here)
- 1 Raspberry pi pico
- 1 SSD1306 OLED screen - (just google SSD1306 OLED and pick the one with 4 pins)
- 12 m3 nuts and bolts
- 12 m3 heat inset nuts
- Some wire (helpful to have some solid core as well - can solder the buttons together easily)
- 16 arcade-style buttons
- The shallower ones... like these
- 3 10k linear potentiometers
- 2 little clicky buttons for the screen controls (like these)
- 1 micro USB cable
Overall Cost (not including shipping, assuming Alibaba parts, super rough estimate): ~ $20-30 bucks?
Skills Required: Basic 3d printing. Beginner-intermediate soldering (we are using most of the pins on the pico so it gets crowded).
Note: you should test everything before proceeding, especially if buying these alibaba parts.
Assembly
- Insert the buttons and pots into the front plate.
- Use the M3 bolts to secure the screen, but DONT TIGHTEN TOO HARD. I cracked like 3 screens before I learned this lesson.
- Use a soldering iron to heat-inset the the m3 nuts into the bottom part of the case.
- Wire all of the button grounds together
- Here it is useful to use some solid core wire, completely stripped. You can snake this around and solder each ground pin to it. It then becomes a rail that you can solder the screen, pots, and control button grounds to as well (instead of using a bunch of different ground pins on the pico).
- Wire the buttons and pots to the board.
- Wire the screen to the board

Reference the raspberry pi pico pinout diagram (google it)
Buttons wiring
GP2 | GP3 | GP4 |GP5
GP0 | GP1 | GP8 | GP9
GP10 | GP11 | GP12 | GP13
GP14 | GP15 | GP16 | GP17
Pots wiring
Pot 1 (Left) - GP26
Pot 2 (Mid) - GP27
Pot 3 (Right) - GP28
Control Buttons
Btn Left - GP20
Btn Right - GP21
Screen
SDA - GP6
SCL - GP7
GND - Any Ground Pin
VCC - Pin 36 (power)
Operation
Plug it into your computer / iPad and look for midi devices in your DAW
Tested on MacOS, Windows and iPadOS
General Operation
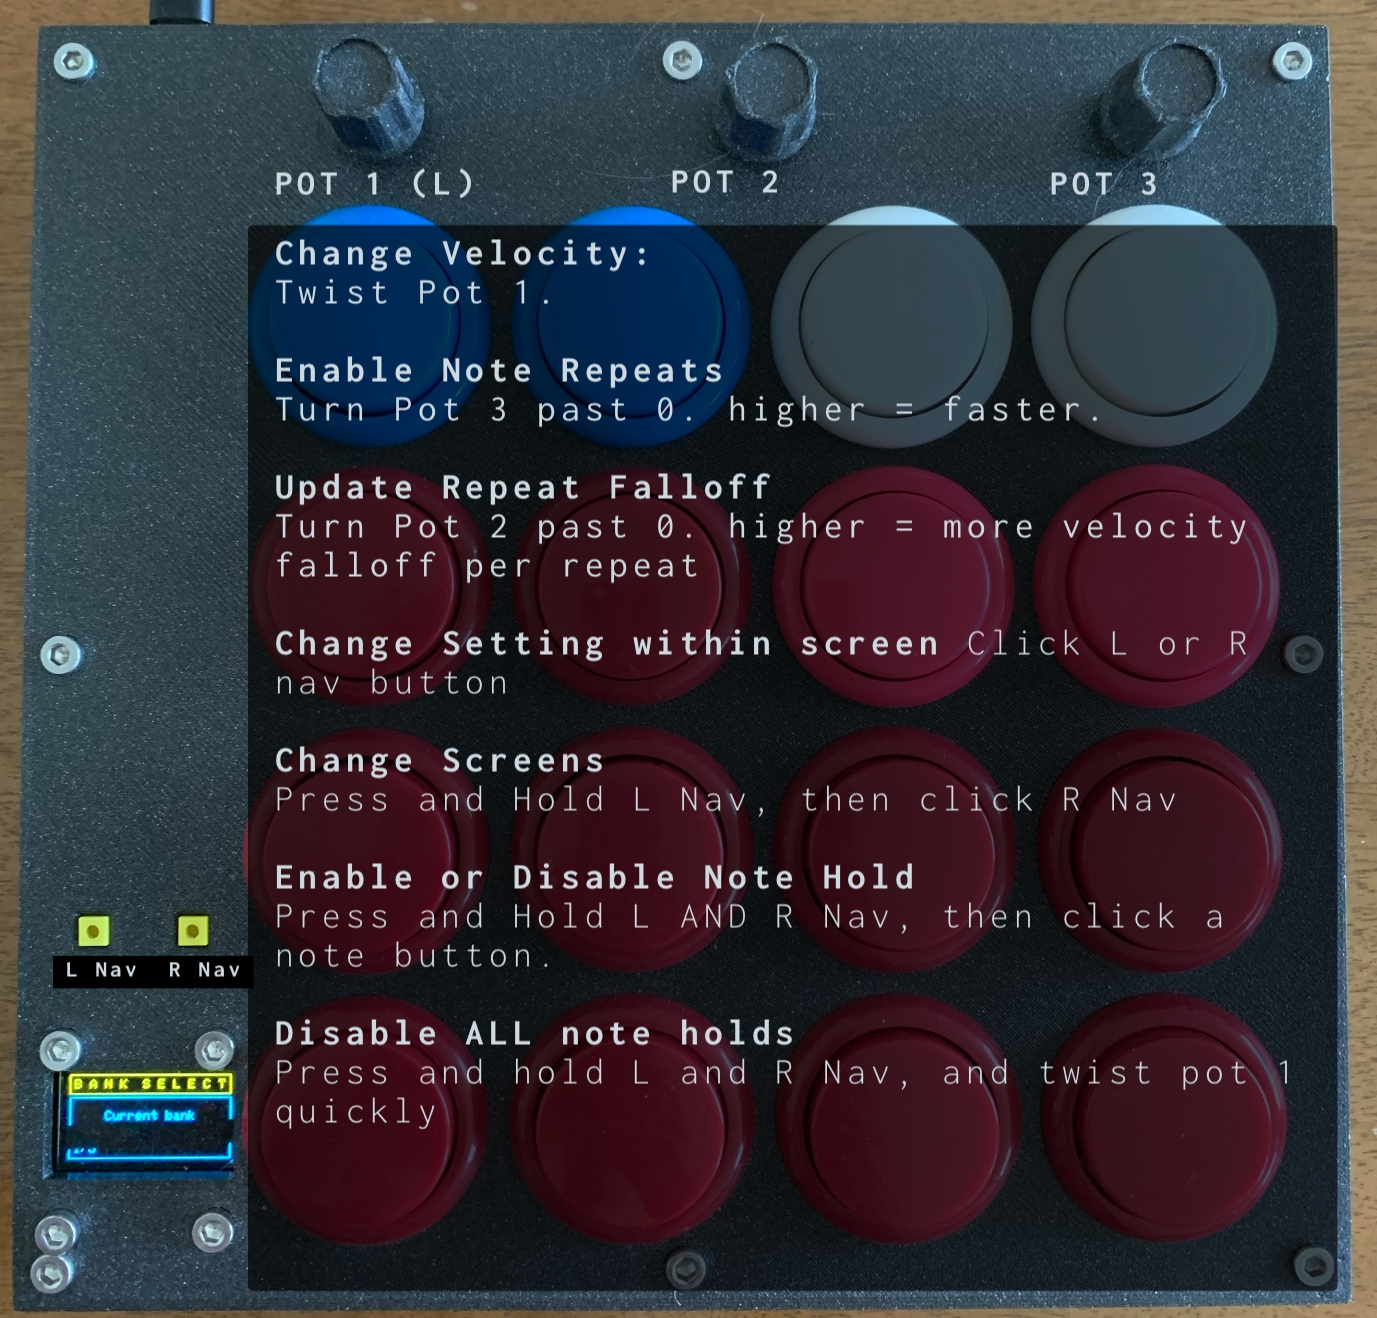
Screens Guide

Fun things to try:
- I created this to use with drums, but it can be fun with melodic stuff too. Try turning repeats on with repeat falloff set to 0 (Pot 2 all the way to the left).
- Now hold both nav buttons, and press a note button. It should now be repeating forever at the repeat speed (knob 3). Do this again with other notes to make a lil looper.
Software (Github)
- Perform setup as described here
- Add code.py and the lib folder from this repo to the base directory of your pico
- If you aren't using the same screen as I noted above, you may have to alter code.py
You can open and edit code.py to your liking. I put some run options near the top of the file. These are constants that other parameters reference, so you can mess with these to easily change some of the general settings.
Enhancements and Optimization Ideas
- Some sort of preset system maybe? So saving custom mapped midi bank values, etc.
- More midi FX - Pot 2 is underutilized
- DAW BPM Sync? No idea if this is possible.
Not sure if it's worth doing until this thing gets bigger and more unwieldy, but would be nice to..
- Refactor code into multiple files. Many of the constants could be separated into another file to make the whole deal easier to read.
- Run options, midi dictionaries, etc.


